X


Calm Company Fund is a leading investor in companies built with no-code tools. Learn More
If you’ve ever tried to cleanly save or export a slack thread, you might’ve realized—it’s nearly impossible! It’s frustrating to let threads get buried, threads you might want to reference for your blog content, newsletter inspiration, and internal company knowledge. Since there’s no built-in way to archive specific slack conversations for future use, we decided to make one ourselves.
Sign-up to our one click Slack Thread Exporter that's currently in Beta as of April 7th, 2023. You're also welcome to read our tutorial below on making your own Slack thread exporter that is a little less powerful.
I’m Michael, Head of No Code Engineering at Calm Company Fund, and I’m going to show you how to setup and launch your own Slack Thread Archiver without needing to know any code at all.
This guide will show you how to cleanly download and export your favorite Slack messages to any other document or database (like Airtable or Google sheets/docs.)
But first, let’s take a look at what this really looks like in a demo video:
The thread archiver is a wonderful tool to export conversations out of Slack for you if:
Tools:
Coding knoweldge level? Easy
Time estimate to set up? 3 hours
Let’s get started.
1.a) Since we want to export threads from Slack that include multiple users (Because it’s a thread), then we need to know who said what in the thread. It all starts with a directory in Airtable that contains the users in our Slack. So let’s make it.
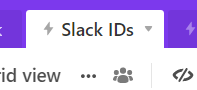
TIP: You could even create a new base in Airtable called “Slack threads” and create a table “Slack IDs” within the base. This way, you would have all your exported threads (Which comes later in this tutorial) and also your Slack User ID directory all in the same base.
What’s a table in Airtable >>>
Let’s move on.
1.b) In your newly created table “Slack IDs”, we need to create the following columns:
Your table column titles & types should look like this:

1.c) Export a copy of your users from Slack


And voila, you will get a downloadable list of all your Slack members.
1.d) Import your Slack users to your “Slack IDs” table in Airtable.
There are a few ways to import data if you have a lot of users.
Whichever way you do it, make sure you assign the values to the appropriate columns such as:
So not Slack IDs > Email, otherwise, you’re already game over and have had too many rum punches.
If you don’t already have a Zapier account, it’s time to create one. Otherwise, login. Things are about to become real.
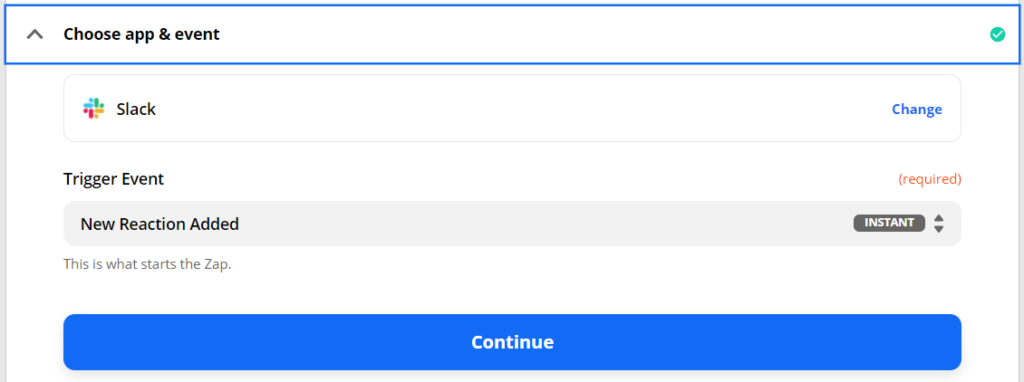
Our first step is to create a trigger event based Slack emoji reaction.
3.a) Choose app and trigger event with the following settings:
3.b) Authenticate your app
3.c) Set up trigger

3.d) Test your trigger.
If for any reason the tests fail, don’t panic, it’s totally normal. There is a known Slack bug related to emoji Slack reactions when testing and most of the time the tests fail… Such is the way of life…
If this happens >>> Skip the test and move on! (Otherwise, you’ll be like me trying to solve something you can’t for hours…).
Yep, things are about to become seriously hardcore. Grab a coffee or Rum Punch like myself and get ready to do a ton of stuff.
In this step, the most important, we’re going to give you the secret sauce that brings this automation to life and makes it all happen. You will become a black ninja level no-coder. If you don’t understand anything, that’s okay, pretend like you do, paste what we tell you to and keep it moving.
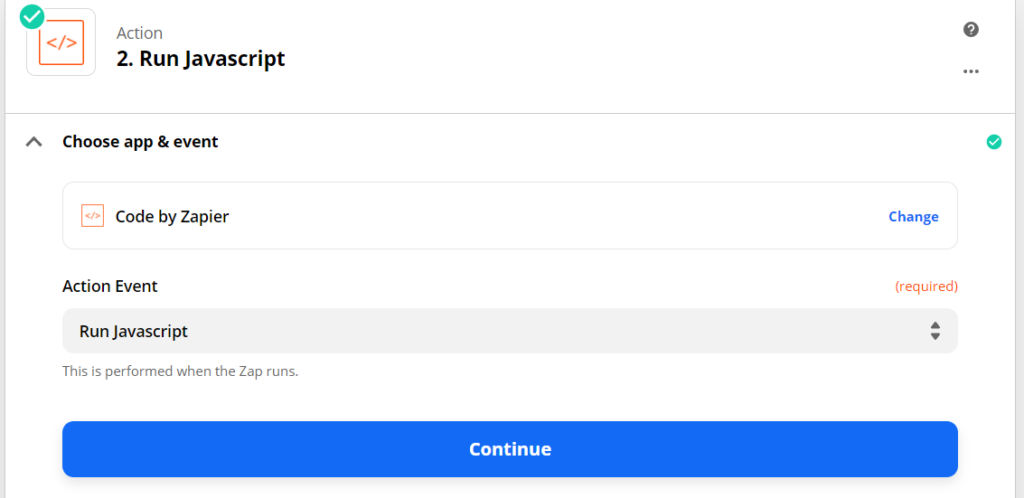
4.a) Make the action event “Run Javascript”.
4.b) Set up action
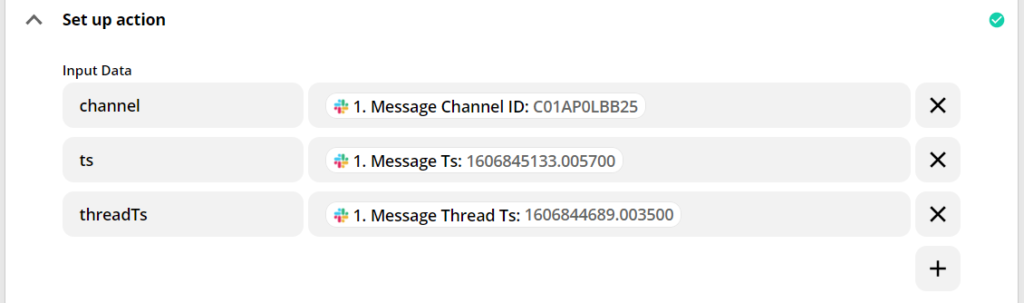
In section “Input Data”, set the three followings settings (Check the screenshot below to understand what I am talking about):
channelMessage Channel ID (Taken from New Reaction Slack trigger)tsMessage Ts (Taken from New Reaction Slack trigger)threadTsMessage Thread Ts (Taken from New Reaction Slack trigger)This is super case sensitive – Don’t mess it up!
Example below:
4.c) Paste the below code in the code section:
const getReplies = async (channel, ts) => {
const params = new URLSearchParams({
token: 'xoxb-xxxxxxxxxxxxxxxxxxxxxxxxx-xxxxxxxxxxxxxxxxxxxx',
limit: '1000',
channel,
ts,
});
const res = await fetch(`https://slack.com/api/conversations.replies?${params.toString()}`);
const json = await res.json();
return {
response: json,
replies: json.messages
};
};
const getSlackMembers = async (ids) => {
const uniqueIds = Array.from(new Set(ids));
const params = new URLSearchParams({
filterByFormula: `OR(${uniqueIds.map((id) => `{Slack ID} = "${id}"`).join(', ')})`,
});
const res = await fetch(`https://api.airtable.com/v0/xxxxxxxxxxxxxxxxxxxxxxx/Slack%20IDs?${params.toString()}`, {
headers: {
'Authorization': 'Bearer xxxxxxxxxxxxxxxx',
},
});
const json = await res.json();
return {
response: json,
records: json.records,
};
}
const {replies} = await getReplies(inputData.channel, inputData.threadTs || inputData.ts);
const slackIds = replies.map((reply) => reply.user);
const {records} = await getSlackMembers(slackIds);
const slackIdToName = {};
records.forEach((record) => {
slackIdToName[record.fields['Slack ID']] = `${record.fields['Name']} (${record.fields['Email']})`;
});
const formattedMessages = replies.map((reply) => `
${slackIdToName[reply.user] || `[Unknown Slack user: ${reply.user}]`}:
${reply.text}
`.trim());
output = {
replies: JSON.stringify(replies),
formatted: formattedMessages.join('\n\n'),
};
This amazing code was provided Kevin Ingersoll, a member of the Calm Company Fund community.
Take a look at the code you just pasted, there are three sections of code marked with “xxxx” that represent links/tokens that we will need to come back to and replace later:
Slack App Authentication token:
token: 'xoxb-xxxxxxxxxxxxxxxxxxxxxxxxx-xxxxxxxxxxxxxxxxxxxx',
Link to your Airtable base & table:
fetch(`https://api.airtable.com/v0/xxxxxxxxxxxxxxxxxxxxxxx/Slack%20IDs?
Airtable bearer token:
'Authorization': 'Bearer xxxxxxxxxxxxxxxx',
But before we can replace anything, we need to move on to the next step and create a Slack app which we will use strictly for authentication purposes. Keep it moving.
In order for us to actually connect all that code we did previously, we need a Slack app as a means of authentication. So off we go.
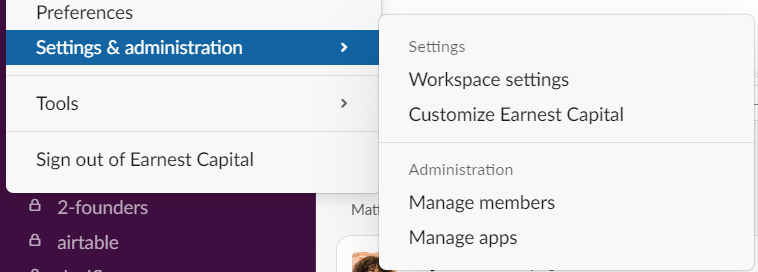
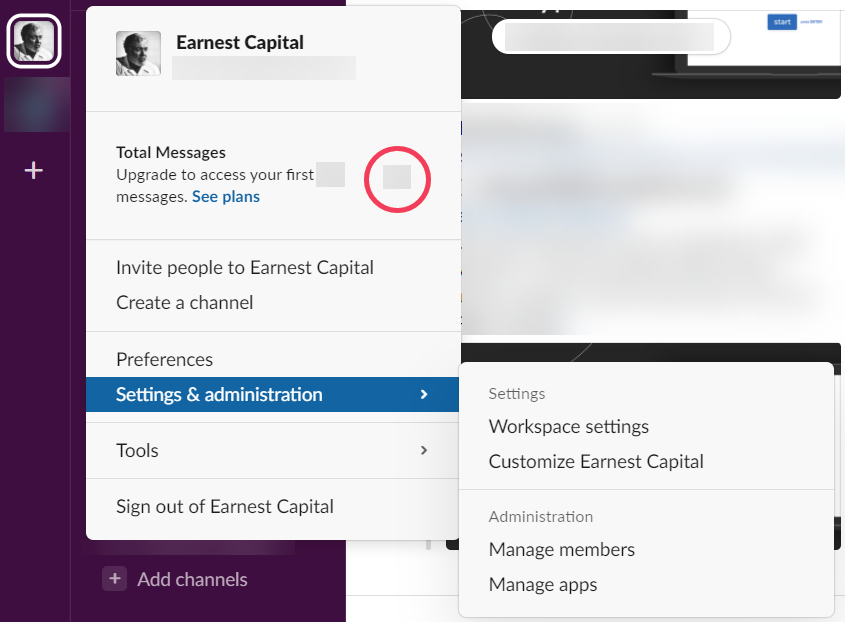
5.a) In Slack, go to “Settings & administration > Manage apps
5.b) Click on “Build” at top of screen.

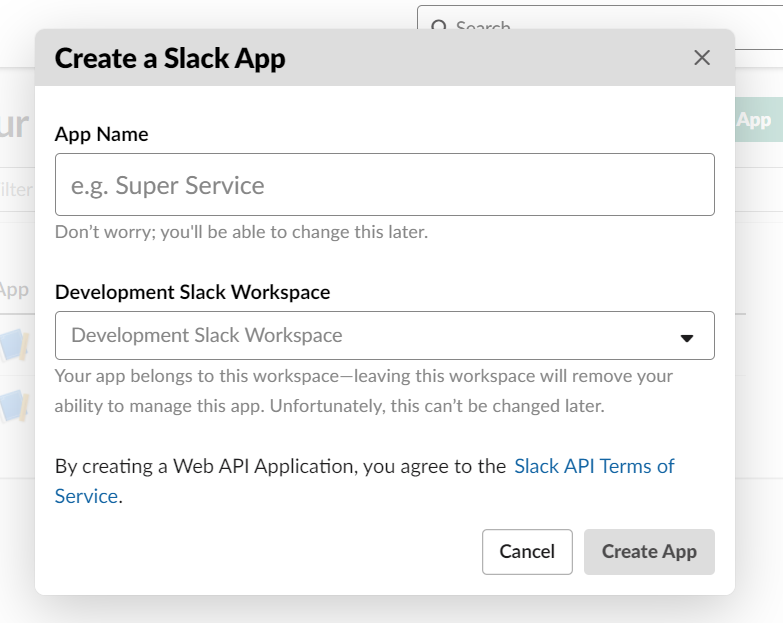
5.c) Click on “Create New App”.

5.d) This window will pop up, enter correct settings:
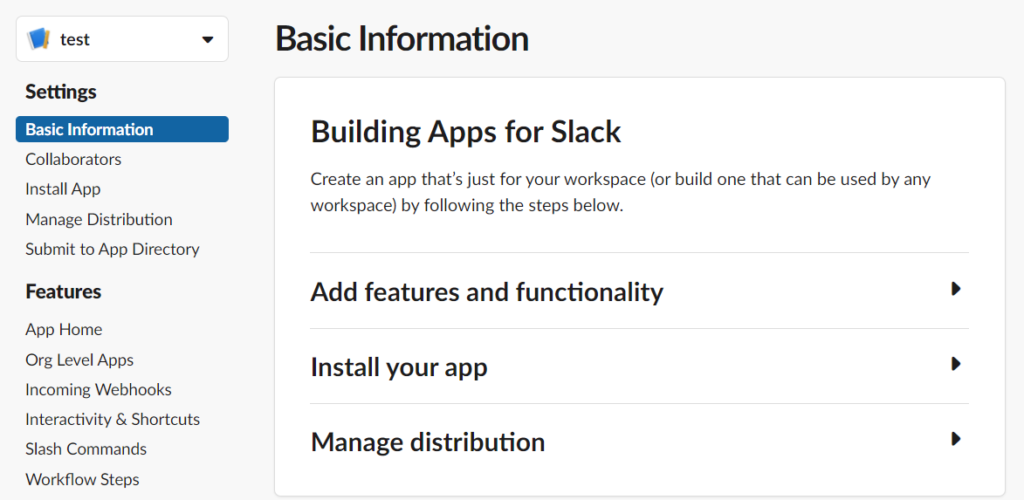
5.e) Now that your app has been created, we need to set a few settings and copy some information.
Click on “Basic Information” in menu if not already on this page.
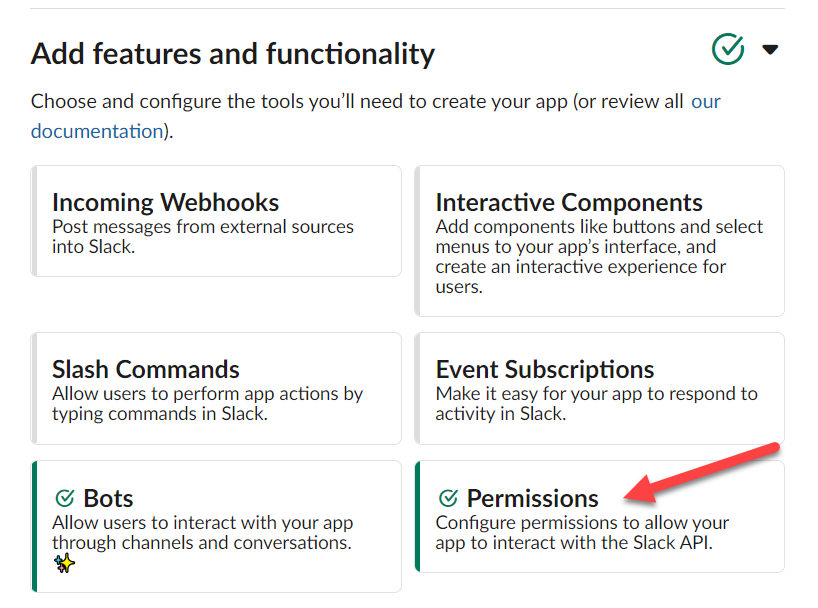
5.f) open “Add features and functionality” and click on “Permissions” section.
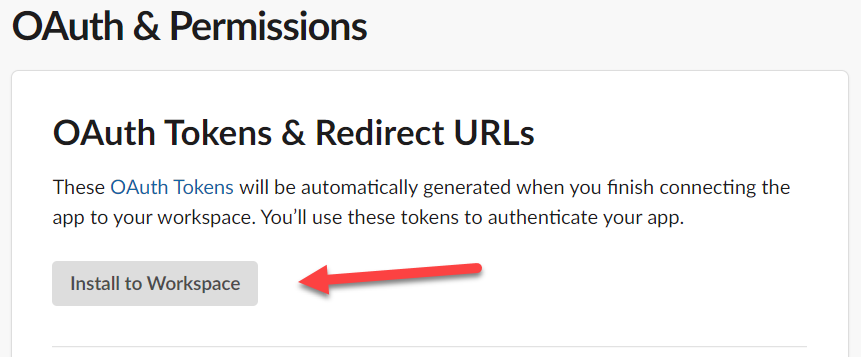
5.g) Click on “Install to Workspace” to install the boat on your workspace and get the Oauth Token.
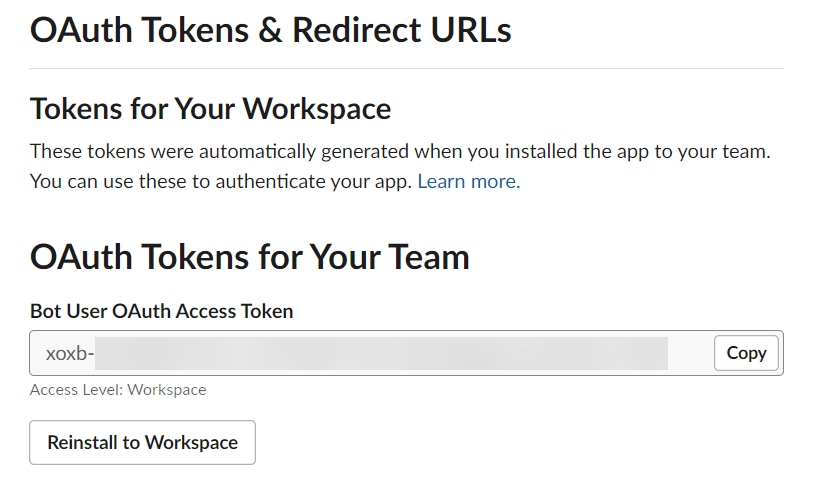
5.h) Boom, you can now see your “Bot User OAuth Access Token“.
Copy the token and paste it in the code we pasted earlier in the Zapier Code step.
You need to replace the below section between ‘xoxb-xxx’ with your new token:
token: 'xoxb-xxxxxxxxxxxxxxxxxxxxxxxxx-xxxxxxxxxxxxxxxxxxxx',
This is where you get the token:
Moving on.
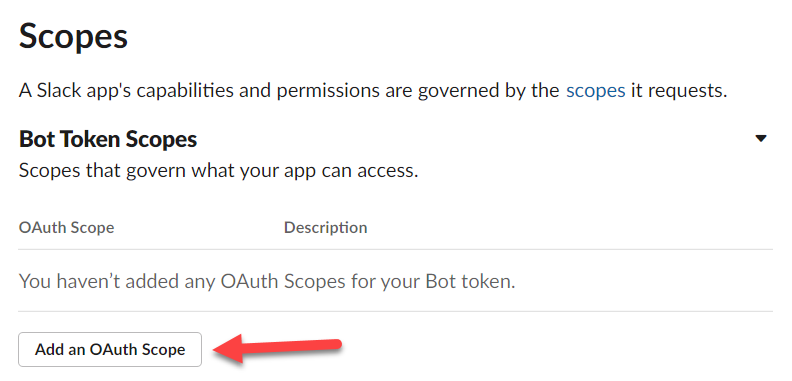
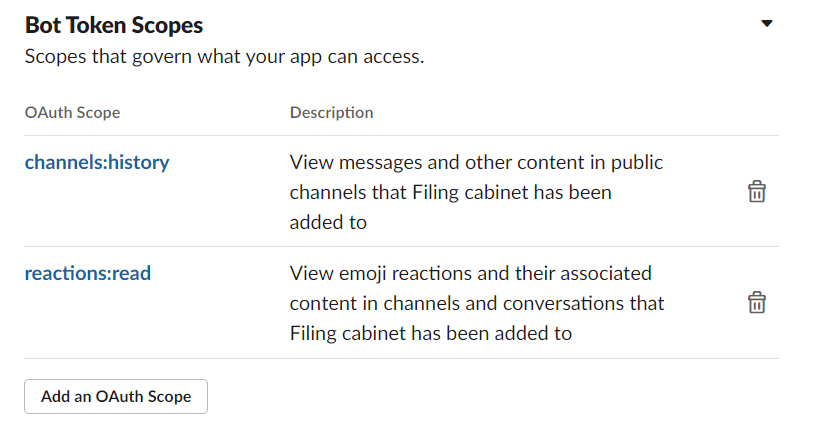
5.i) Scroll further down on same page all the way to “Scopes” and click on “Add an OAuth Scope” in the “Bot Token Scopes” section.
5.j) Choose two permissions only.
so end results looks like this:
5.k) Time to actually install the app in each channel you want in your public Slack channels where you want it to operate.
Congratulations, you’ve now created and installed your first app!
Earlier on, we created an Airtable to store all our user Slack Ids, we need to update the code to that Airtable Base/table and the bearer token for authentication so that the step “Code by Zapier” will function properly.
Update the link to your Airtable Base and table in the Javascript Zapier step “Code By Zapier”.
To do this, go to this link right now >>> https://airtable.com/api (You do need to be logged into Airtable).

fetch(`https://api.airtable.com/v0/xxxxxxxxxxxxxxxxxxxxxxx/Slack%20IDs?
'Authorization': 'Bearer xxxxxxxxxxxxxxxx',
Here is how to get your bearer token >>>
By now, you’ve replaced the following in the code section in the Zapier Javascript step:
Congratulations on making it this far, about 90% of everyone else has drowned themselves in rum by now.
This is it, the final easy step.
Smooth sailing from now on. All that’s left is to save our Slack threads in Airtable.
7.a) Either make a new base and create a table called “Slack Threads” or simply add this table to the base you created earlier. Call it whatever you want, this won’t affect automations.
7.b) Add some nice columns as shown below:

7.c) Create a new step in Zapier “Create Record In Airtable”.

7.d) Authenticate your Airtable App with Zapier (This should have been done earlier when creating the Slack User ID directory).
7.e) Setup action.
It should look exactly as below.

If it worked, congratulations!!! If it doesn’t, then you may have missed something in the above instructions, check it all again and check what errors Zapier is mentioning.
If you’ve made it past Step 7, you have become a no-code ninja and have an amazing tool for your company to use to create all kinds of great content.
If you’re using this tool, please share it with us on Twitter @earnestcapital @tylertringas @michaelrouveure! We’d love to hear how you’re using so much magic at your fingertips.
Keep it moving

